https://johnr.hifizine.com/2013/03/room-eq-wizard-spl-calibration-without-an-slm/
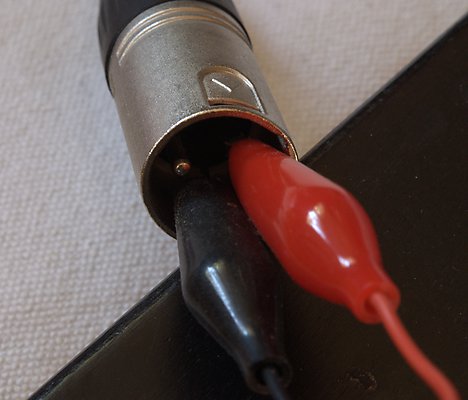
[size=1.35em]DRAFT – not fully tested yet. SUBJECT TO CHANGE. [size=1.35em]The conventional method of “calibrating” the SPL (sound pressure level) in Room EQ Wizard is to use an external sound level meter (SLM). This procedure, documented in the REW online manual, basically means playing a signal through the speakers, measuring the result with a separate SLM, and telling REW what the reading is, so it can “match it up” with the electrical signal being received from your measurement microphone via your soundcard / audio interface. [size=1.35em]The accuracy of this method depends largely on the accuracy of the external SLM, and to some extent on your ability to put a measurement microphone and an SLM at the same point in space. With a cheap SLM, in addition to the basic level being a bit off, the varying frequency response (see last graph of linked article) may lead to a different reading depending on the nature of the measurement signal. But in any case, it’s good enough to get a “ball-park” reading that is adequate for most in-room and speaker measurement purposes. [size=1.35em]If, however, you have a microphone with a calibrated sensitivity reading, you can do the calibration without needing an external SLM. You will also need an inexpensive digital voltmeter (DVM). [size=1.35em]What is a “calibrated sensitivity reading”? Just a conversion factor between sound pressure level and the voltage generated by a measurement microphone as a result. A commonly-used SPL for this purpose is 94 dB, which is equal to 1 Pascal (Pa) of pressure variation (super-imposed on the “DC” atmospheric pressure). Here is the conversion factor that came with my “Premium+” calibrated EMM-6 microphone from Cross-Spectrum Labs: [size=1.35em] [size=1.35em]In other words, at an SPL of 94 dB, the microphone produces 11 mV of output. Great (if you have one)! But, how do you use it? Actually, it’s simple. (And to be honest, it took me nearly a year to realise how simple it is, so I felt it’s worth writing down for others as well.) In addition to the calibrated microphone, you will need: - A loopback cable. If you’ve followed the REW documentation on how to calibrate your soundcard (for frequency response), you should already have one of these. For most common soundcards, the two ends will look like this (XLR on left, TRS on right):
 - A digital voltmeter (DVM). You don’t need an expensive (never mind calibrated$$!) one here, just a fairly basic one will do fine, as long as it has an AC voltage range of 2 V. Even cheap DVMs have an accuracy of at worst a few percent – bear in mind that even if the DVM is 10% out, your SPL readings will only be off by just over a dB.
[size=1.35em]So here’s the step-by-step. This procedure is designed to gave reasonable readings with inexpensive equipment, and should work with most hardware. All of this assumes that you are already able to use REW to make measurements, that you have a microphone calibrated for frequency response, and that you have loaded the mic calibration file; if not, consult the REW online help and the REW forum before attempting the following. - Plug the TRS end of the loopback cable into your soundcard output. Set the DVM range to its 2 VAC range, and connect it to pins 2 and 3 of the XLR end of the cable. Clipleads are very handy here:
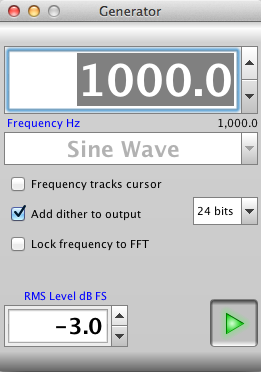
 - Open the REW signal generator, set it to generate a 1 kHz (see Note 1) sinewave at -3.0 dB (full output), and turn it on:
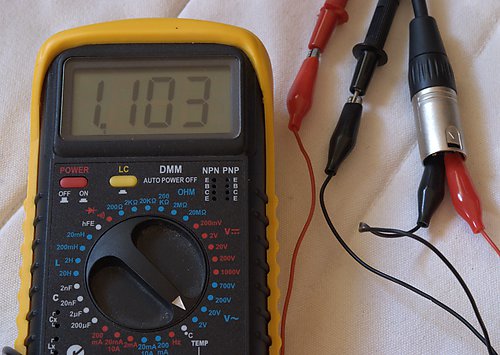
 - Adjust the output level of your soundcard until your DVM reads exactly (as close as you can get) 100 times the 94 dB sensitivity reading. So with the 11 mV/Pa sensitivity figure shown above for my EMM-6 (each individual mic may be different), the DVM must read 100 x 11 mv = 1100 mV = 1.1 V.
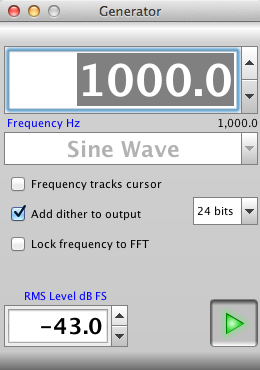
 - Now, we set REW to generate 1/100 of that voltage, by changing the RMS level in the REW signal generator to –43.0 dB. The voltage on the soundcard output will now be the same as the voltage generated by your microphone when the SPL on it is 94 dB.:
 - Remove the clipleads, turn off phantom power (see Note 2), and plug the XLR end of the loopback cable into your soundcard’s mic input.
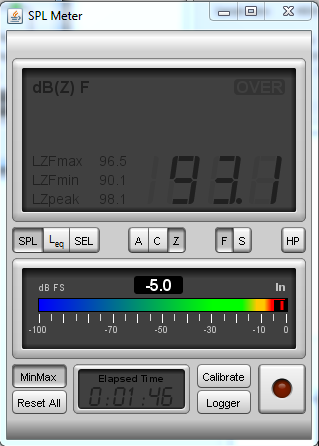
- Open the REW SPL meter, and look at the level meter labeled “dB FS” in the bottom half of the window. Adjust the input gain of your soundcard until the level reads fairly high, but not higher than -3 dB. Let’s say -5 dB (see Note 3). Like this:
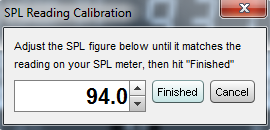
 - Now click on the Calibrate button. The default value that comes up should be 94, but if not enter it, then click on Finished. You will get a notice that the maximum level that can be measured is 99 dB (with the level set to -5 dB).
 - Turn off the signal generator. Unplug the loopback cable. Turn on phantom power, and connect your microphone to the mic input. Connect your audio or HT system to the soundcard output as you normally do for measurements, and then turn your system on.
[size=1.35em]You should now be able to set your output levels and make a measurement. Note that you can change the output level at any time to suit: in REW itself, with your soundcard’s output gain control, or with your system’s master volume control. However, you must not change the gain of the mic input of your soundcard, or your SPL readings will no longer be accurate (and you will have to redo the above procedure). [size=1.35em]Some notes, referenced from the above steps: - I’ve read that cheap DVMs are most accurate at mains frequency i.e. 50 or 60 Hz. I’m not sure how relevant this is, as mine is only a fraction of a percent different between 50 Hz and 1 kHz. At any rate, you can easily check if your meter reads differently at 50 (or 60) Hz and 1000 Hz by changing the frequency in the REW signal generator.
- Your soundcard is probably safe with 48 VDC phantom power on its output, and I have inadvertently left phantom on while making a loopback connection and not damaged anything. However, it’s much safer to make sure that phantom power is turned off, as it is possible that 48 VDC on the outputs of a solid state circuit will severely damage it.
- This setting is not critical, as long as it’s no higher than -3 dB. It determines the amount of headroom in your measurement. If you measure at the recommended level of 75 dB SPL, the setting in step 6 should generally give enough headroom. If REW warns that you are clipping a measurement, then you will need to either reduce your SPL or redo this step with the level set lower – like say -10 or even -20 dB.
A note on accuracy[size=1.35em]Some caution is needed with regard to accuracy of measurements like this. It would not be reasonable to expect that the above technique will give you fractions of a dB accuracy in your SPL measurements. I suspect that many hobbyists are unrealistic in these regards, and don’t realize how expensive and difficult it is to get SPL measurement accuracy to sub-dB tolerance levels. [size=1.35em]In the realm of a typical hobbyist, the sensitivity figure in a microphone calibration from Cross-Spectrum Labs is in the range of +/- 1 to 1.5 dB. You must also remember that your microphone’s output will vary with temperature and humidity, and your DVM also has a tolerance. I think it’s reasonable to state a tolerance when using this method of +/- 2 dB. Again, if you need higher tolerance, you’ll need to be prepared to pay a lot more for it. [size=1.35em]Beware also of mic calibration files that are not 0 dB at 1 kHz. Earthworks, for example, provide a calibration that is relative to a reference microphone, rather than treating the 1 kHz reading of the mic-under-test as 0 dB. In cases like this, you’ll have to adjust accordingly. [size=1.35em]Note also that I haven’t yet compared results obtained using this method with a calibrated SLM. There are a couple of ways in which an error of 3 dB (difference between RMS and peak) or 6 dB (difference between balanced and single-ended) could be introduced. I’m fairly sure that this method works correctly but until I am able to compare the result obtained this way with a calibrated SLM, I am only going to say that it “probably works.” [size=1.35em]Please report in a comment below if you have used this method and compared it to a calibrated SLM. Thank you!
|


 发表于 2018-9-17 20:02:13